Showing posts with label original art. Show all posts

Monday, 11 April 2016

Pot plant papercut

I did another papercutting this weekend and although halfway through I felt like I was going insane I am so so pleased with how this turned out! 


This piece reminds me a lot of Jean Jacques Rousseau, He was one of my favourite artists growing up. I love all the stylised foliage in his jungle pictures. Apparently he spent a long time in botanical gardens painting different exotic plants which he later used in his paintings (that from a essay I wrote for my IB art class..). 


I especially like that this piece depicts our actual plants on our actual window sill. Most of my papercuts are pulled from my imagination so it was nice to do something different. 

But man, I could really tell that this was a new direction...I must have gone through 10 blades cutting this piece. That window pane was a killer. I'm glad I stuck at it as the lines of the panes work really well with the organic shapes of the plants. 

I'm excited to do more of these but for now this one is now available in my shop


Saturday, 9 April 2016

Deer papercut - now in shop

So I finally did a new papercut! It's been ages as I have been busy with my quilt. I have had some plans rattling around in my head for a while and haven't really been able to get them out...


This isn't the actual project I had in mind but as it is a departure from my usual style and process for papercutting I just wanted to do a quick project to test the water. 

I actually did most of this piece one Sunday evening so it was fast which was really satisfying. 

The black outline approach is new for me...it does add a layer (haha) of complexity but I do like the way it looks like stained glass. 


Here's how it came together:


1. I used a white pen to sketch the
outline of the image and then cut out
the lines..
2. The finished outline - this is all cut
from a single piece of black craft
paper.


3. I started building up the colours inside
the outlines. I started with the foreground
- flowers, deer and worked backwards. 
4. Building up the various layers to
create the background and sense of
depth.


And...done! I like how it turned out and it was fun to try a new style. I also feel like I have a better idea of how to take forward a bigger project that I am trying work out. Although probably more smaller projects like this are in order before I dive into that so keep posted... 

This piece is now available for sale in my Etsy shop

Saturday, 2 April 2016

Some good stuff I saw recently..

I've noticed some good stuff about at the moment and thought I'd share...


- A papercutting competition! If like me you’ve fallen off the wagon and need to dust off your scalpel and get back on.. check it out here.

- Last episode of Fresh Meat (Channel 4 here in the UK). This show was so great and the last episode was brilliant... I'm literally going to start re-watching the whole thing immediately. If you haven't seen it, do.

- This amazing work from Conrad Jon Godly. How stunning? Credit to Danielle Krysa @ The Jealous Curator for bringing to my attention. Reminds me of my love of Kyfin Williams and my own forays into oil painting.

- I just discovered Marimekko design. I am going to have to use some restraint in not buying all the plates, they are great. 

Enjoy!


Sunday, 27 March 2016

Elephant baby quilt - done!

I have finished my quilt! 

It was a LOT of work but it went really well and I got it to it's intended baby before he was more than a few month old so that was a result. 

I didn't blog about all the steps in between where I left off and the finished piece - I was all focussed on just getting it done. The previous posts on my quilt progress are here: part 1, part 2, and part 3.

So, the elephants are done and stitched to the quilt top and next I moved on to the balloons. I decided on 3 different red fabrics for them, and decided on an arrangement that worked with the position of the elephants and sun. As with all the other elements of the quilt I first drew and cut the shapes on to tracing paper and then fusible web. I then used the tracing paper templates to cut out the balloons from the three red fabrics - I prepared the appliqué balloons the same way as the sun - turning in a 1/4 inch seam allowance around the edges of the shape. 

Once these were done I was able to assemble the quilt and adjust placement of all the elements:


And then blind stitch/applique them all down on to the quilt top - it was a good feeling to finally have all these bits and bobs come together into one unit.

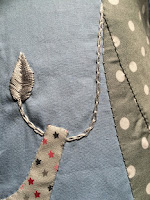
So after that, I employed some very basic embroidery to work in the elephants tails and the strings of the balloons.

I used chain stitch for the balloon strings and most of the elephants tail and satin stitch for the end of the tail.

I really have no experience in embroidery but I liked doing this and how these bits turned out.


So at this point I had a finished quilt top. Awesome. 

Next up, putting it all together. I knew my backing was going to be this great blue and white polka dot, but I wasn't sure on the binding... I was thinking about red or yellow but they seemed too close to the balloons and sun so I decided to bind the quilt with the backing fabric. 

2
1


3
4


1. To make the quilt 'sandwich' you need enough floor space to lay the quilt flat. I laid the quilt backing, right side down, on the floor smoothing out any wrinkles. Then I laid the quilt batting on top - getting this positioned and flat can be tricky, batting is sort of clingy. 

2. Next the quilt top goes down - face up. You can see that the batting is cut slightly bigger - I find it easier to do this and then trim it down to size. 

3. I used a few pins to secure the 3 layers together. I find it best to start in the middle and work out toward the edges, smoothing it all flat as you go. I folded over the edges and clipped them together.

4. Finally, I used a basting stitch, starting at the middle and working toward the edge in straight lines and then again in increasing concentric circles. This is a sort of annoying and time consuming task but it is really worth it. It makes it much easier to work with the quilt all the layers are well fixed and not slithering about. 

SO THEN...actual quilting...finally. I don't really have any pictures of this as its hard to photograph but basically I used small running stitches in matching colours (yellow for sun, red for the balloons etc) to outline the different applique elements. 


The sky and grass had some large areas which needed some additional quilting to keep the layers together so I added some quilted clouds in the sky and some scattered flowers in the grass. 


Once all the quilting was done it was time to do the binding. I trimmed the quilt top and batting to 1 inch less than the backing fabric. I folded over the excess backing fabric twice, first fold with the raw backing edge against the edge of the topper and backing, then over again on the quilt top. 

I used the much more detailed instructions over on the super helpful tutorial on cluck cluck sew.


I added a last minute label to the back of the quilt - my name and date I finished the quilt. I guess this is a thing that's done? It's a good idea. 

And it's done! After a final wash in the machine (on gentle). 

I'm really pleased with it. And so was my friend, the baby seemed indifferent. 

This was a pretty all consuming project for a while and sort of bumped all other crafting and papercutting out of the picture for a while. I did manage a few other projects since then so more on those next...

Sunday, 9 August 2015

Guacamole and a new project

We have been having a fairly great summer here in London and I have been spending a lot of time reading in the sun rather than doing as much art and crafting that I need/should be doing. 

I have also been eating a lot of guacamole. I have been making this for years and think I have pretty much got it nailed with info gleaned from years of helping out at 4th of July BBQs. 


I guess most people know how to make guac - but this is mine:

  • 4 avocados
  • A handful of cherry tomatoes (maybe 10? I personally wouldn't substitute regular tomatoes here as cherry are just way better tasting - but if you have great tasting regular tomatoes then go for that)
  • 1/2 a red onion
  • A handful of cilantro/coriander/dunia
  • Lots of limes (I used 3)
  • Salt
  • Pepper
  • Hot sauce


Cut all finely and smoosh/stir together. Eat all weekend in lieu of actual meals.


I am working on a new project, a quilt! It's going to be a challenge as the last one I did was about 6 years ago and I uselessly documented nothing so I have already made a bunch of stupid mistakes that could have been avoided but oh well. 

I do plan to blog about this so at least if I decide to do this again in another 6 years I'll hopefully have some idea of what not to do...again..

These are the fabrics in play - maybe too many patterns? I'll be sharing the idea in the next few days, once I have organised my thoughts!


Sunday, 26 July 2015

The owls are not what they seem - Twin Peaks papercut

I think owls were one of the very first papercuts I did way back in 2007 (?) - and I seem to come back to them every couple of years. 

This latest one I started months ago...and sort of lost the thread and put it aside for a bit, which then turned into a bit more than a bit. While I was doing a big paper tidy up and inventory today it turned up in a pad of paper and I was finally inspired to finish it up (also, it was super rainy so the garden was in no way tempting..).


So I had started the pair of owls, a big and little, framed with a circular branch in turquoise but I wasn't really sure what to do next...although I liked the dark blue background as it was a nice contrast to the owls and looked night-time-ish.


Technical side note for anyone who cares: Gluing down all this sort of piece, especially when it's origami paper rather than artist paper (which is thicker) is always the most tricky bit of the process. I have tried a bunch of different approaches - glue sticks, glue pens, and starch paste...I use all of these at some point but my preferred method is good old pva glue, a toothpick and a load of patience...

Anyway, back to the owls...the night-timishness of the dark blue (and my recent sorting and discovery of lots of grey paper) made me consider the addition of the moon which sort of left a gap in composition. I have been meaning, and avoiding, attempting lettering in papercut but this seemed like a good opportunity to try. 

Twin Peaks has been a long standing fixture in my life since uni...I've lost count of how many times I've watched it and quoted it and it was a definite plus (on both sides) when James and I were in the early stages of dating and realised the other was a fan.

So going down the 'owls are not what they seem' route was a bit of a no brainer. 


The lettering was not a walk in the park but I like the way it turned out so I am up for the challenge of having another go. 

In the meantime, this piece is now available for sale in my shop - don't miss a chance to have a bit of original Twin Peaks art! 


Monday, 4 May 2015

Peacock papercut - prints and cards now in shop...

This post has been a long time coming... and another thing that was on my fast-depleting list of things to do for the bank holiday...

A while ago I posted here and here about a papercut I was doing featuring a white peacock. 


I loved how this turned out, especially as it's a departure from the traditional black-on-white approach. 

I decided to have the image reproduced on greeting cards and art prints and I think they turned out great!


The cards are A6 and come with a brown craft envelope and cellophane sleeve:


They are blank on the inside and have a nice weight to them and matte finish which works really well with the design. 

I've already sent a few to friends and family and had a great response so I'm really happy with these.


Next up were the art prints. I had these done as giclee prints on hahnemuhle photo rag paper, which I have used for printing my art before. I think the quality of the print and paper are just lovely. 

I had these done in A5 and A4 and although I love both, the A4 is really striking and looks amazing with the fine detail of the image. 


I'm glad to finally get these out and into the shop.  

Link to the cards is here and the prints, A5 is here and A4, here

Thanks for looking!

Sunday, 25 January 2015

White peacock papercutting

It's been a while since my last post but I have been getting stuck into the new supplies and new projects...I haven't *quite* finished the Hamsa papercut, so more to follow on that soon.

I have gone back so some of my roots though in one of my recent projects. When I started papercutting, years ago, my main source of inspiration was the East African art movement, Tinga Tinga and peacocks were one of my preferred subjects. I haven't done any in a while and in this I wanted to do a very traditional papercutting piece, in white. 


I started out with a sketch in my sketchbook to plan it out. This was then transferred to white cartridge paper and then I started the cutting process. After a lot of the maps and more graphic work I have done recently this is one of the more organic and detailed pieces I have done in a while..which was a fun challenge.


This next bit was fun. I wanted to test out different options for the background for the final papercut - I didn't even want to wait until I was done with the cutting. 

I was torn about the choices. My boyfriend was really keen on the first one, the raspberry. Whereas I was keen on the one below, the dark purple, which I thought showed up the design better with contrast... 
It was a tough choice, and annoyingly, the wretched winter gloom hasn't done the pictures any favours - what would you vote for?  


Final choice to follow...I have further plans for the finished piece so stay tuned. In the meantime, here is the final, unmounted piece:


I'm pretty happy with the final result. 

When I told my Mum I was doing a white peacock she reminded me of an albino peacock we met on a family trip in the 1980's to Mt Kenya Safari Club. Apparently our family turned up with me, aged 3 or something only to find out that there was no kids allowed! 

We were hours away from home in Nairobi and my parents made a good enough case that I was such a well behaved child that no one would complain - which worked. 

I remember pictures of me and this white peacock that my parents took in the grounds of the hotel. 

It's nice to think that maybe that was a subconscious inspiration for this piece (Hi Mum!)

Tuesday, 30 December 2014

Custom papercut map

A relatively new addition to my Etsy shop has been these custom papercut maps...These are great fun. I love the variation in each and getting a small glimpse into places that matter to people...family homes, places where you got married, places where you lived.


One of the things that I have had to wrestle with these is they often look massively hectic and messy halfway through. With most papercuts I think of them like carving a sculpture, chipping away the negative space to reveal the image. These are more like lino cuts, layering up the different colours, figuring out what layer needs to be cut away to expose the one below.


Once these are through the hectic phase it all falls into place. I love how these turn out, looking quite abstract to someone who doesn't know but make perfect sense  to the person that commissioned it. 

I think its such a neat way to commemorate a place that means something to you.

Available in my Etsy shop, or just drop me a message if you want to know more.