I have finished my quilt!
It was a LOT of work but it went really well and I got it to it's intended baby before he was more than a few month old so that was a result.
I didn't blog about all the steps in between where I left off and the finished piece - I was all focussed on just getting it done. The previous posts on my quilt progress are here: part 1, part 2, and part 3.
So, the elephants are done and stitched to the quilt top and next I moved on to the balloons. I decided on 3 different red fabrics for them, and decided on an arrangement that worked with the position of the elephants and sun. As with all the other elements of the quilt I first drew and cut the shapes on to tracing paper and then fusible web. I then used the tracing paper templates to cut out the balloons from the three red fabrics - I prepared the appliqué balloons the same way as the sun - turning in a 1/4 inch seam allowance around the edges of the shape.
Once these were done I was able to assemble the quilt and adjust placement of all the elements:
And then blind stitch/applique them all down on to the quilt top - it was a good feeling to finally have all these bits and bobs come together into one unit.
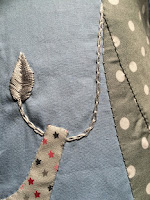
 So after that, I employed some very basic embroidery to work in the elephants tails and the strings of the balloons.
I used chain stitch for the balloon strings and most of the elephants tail and satin stitch for the end of the tail.
I really have no experience in embroidery but I liked doing this and how these bits turned out.
So at this point I had a finished quilt top. Awesome.
Next up, putting it all together. I knew my backing was going to be this great blue and white polka dot, but I wasn't sure on the binding... I was thinking about red or yellow but they seemed too close to the balloons and sun so I decided to bind the quilt with the backing fabric.
 |
| 2 |
 |
| 1 |
 |
| 3 |
 |
| 4 |
1. To make the quilt 'sandwich' you need enough floor space to lay the quilt flat. I laid the quilt backing, right side down, on the floor smoothing out any wrinkles. Then I laid the quilt batting on top - getting this positioned and flat can be tricky, batting is sort of clingy.
2. Next the quilt top goes down - face up. You can see that the batting is cut slightly bigger - I find it easier to do this and then trim it down to size.
3. I used a few pins to secure the 3 layers together. I find it best to start in the middle and work out toward the edges, smoothing it all flat as you go. I folded over the edges and clipped them together.
4. Finally, I used a basting stitch, starting at the middle and working toward the edge in straight lines and then again in increasing concentric circles. This is a sort of annoying and time consuming task but it is really worth it. It makes it much easier to work with the quilt all the layers are well fixed and not slithering about.
SO THEN...actual quilting...finally. I don't really have any pictures of this as its hard to photograph but basically I used small running stitches in matching colours (yellow for sun, red for the balloons etc) to outline the different applique elements.

The sky and grass had some large areas which needed some additional quilting to keep the layers together so I added some quilted clouds in the sky and some scattered flowers in the grass.

Once all the quilting was done it was time to do the binding. I trimmed the quilt top and batting to 1 inch less than the backing fabric. I folded over the excess backing fabric twice, first fold with the raw backing edge against the edge of the topper and backing, then over again on the quilt top.
 I added a last minute label to the back of the quilt - my name and date I finished the quilt. I guess this is a thing that's done? It's a good idea.
And it's done! After a final wash in the machine (on gentle).
I'm really pleased with it. And so was my friend, the baby seemed indifferent.
This was a pretty all consuming project for a while and sort of bumped all other crafting and papercutting out of the picture for a while. I did manage a few other projects since then so more on those next...