Sunday, 27 September 2015

Making a baby quilt - Elephant ears and eyes (part 3)

More progress on the quilt - I'm in the middle of a couple of fiddly bits on the elephants to sore them out. Ears and eyes. 

First and also undocumented (oops, sorry) I stitched all the pieces of the elephants together with invisible stitch - so the elephants are a now a single unit rather than a head, body and bunch of legs.

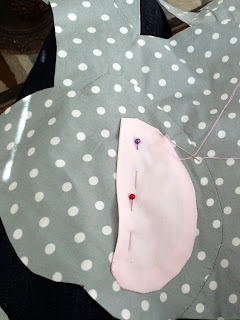
Ears, much like the other pieces are based on a paper template, fusible web and turning in the cut edges. I then pinned this to the elephant and stitched together:


On to the eyes. Embroidery - arg. I have embroidery thread from old cross-stitch endeavours, but really I am just winging this and basing what I need to do on stuff that my Mum taught me when I was a kid. 

So the eye. I used a basic satin stitch for the white and black of the eye and outlined with a running stitch. It's not my forte at all, but luckily this turned out ok, I think. 


I'm chuffed with this - they look cute. I like how they are taking form. 


Next is the balloons - I would have had more on this but I forgot to wash the fabric - and I'm a grown up now and know this isn't a stage you miss (see here). But happy with the result so far!

Making a baby quilt - Appliqué sun (part 2)

I mentioned my first steps of my baby quilt in my last post, here.

I made some good progress this weekend, luckily as the baby was due last Friday - luckily the baby is shy and hanging on and buying me some time (thanks baby!).

When I left off I had done most of the elephants - folding in the edges of the various pieces they are comprised of and securing with fusible web. 

Next I tackled the sun. I wanted this placed in the top left corner - I find it helpful to have the quilt topper out so I can test composition options:


I used a conveniently yellow piece of scrap paper to check size and placement. 

Also at this point I was looking at different options for binding - the red at the bottom was considered and then discarded. I have other plans for red. 

Back to the sun - when I tried this I decided that I wanted a spikey (?) sun rather than a smooth round one. Nice. Much more work!


1
2
3


4


1. I used the paper template to trace a circle of fusible web and yellow fabric with a 1/4 in seam allowance. Two points to note here - first, the little 'v's nicked out of the seam is a good trick to help turn in a round seam. Second, I folded the template circle into eighths to give the width of each of the sun-rays (spikes!)

2. Folding in the seam allowance bit by bit and pressing as I go to secure with the fusible web.

3. All edges folded in and secure, on the reverse side.

4. Right side up - main bit of the sun done!

5
6


5. For the spikes/rays I cut out a triangle template with the edges of the same witdth of the folded template in picture 1. I cut out eight triangles of fusible web, and eight triangles of yellow fabric (with a 1/4 inch seam allowance). I placed the triangle of fusible web in the centre of the fabric, nipped the corners off to help with the folding in, and pressed in each edge of the eight triangles. 

6. I pinned each of the triangles to the circle and stitched together with invisible stitch. 

Sun: Done. 


Sunday, 20 September 2015

Making a baby quilt - Appliqué and elephants (part 1)

One of my best friends is having a baby very soon (too soon, quilt-wise) and I am making a baby quilt for her. 

Years ago when the first of my friends got pregnant I decided to do the same thing and made my first quilt. I think I sort of understood the basic principle (a batting sandwich) but it was a pretty challenging experience - and as I chose to do the whole thing by hand, lengthy too.

But it turned out pretty well in the end and my friend was really chuffed. 


Anyway, that was over 6 years ago and I have no idea how I got from the pile of material stage to the one above. It involved appliqué...lots of invisible stitch...and a bit of luck?!

Well, I'm doing it again and this time I will try to document the process better. 

I knew I wanted to do something similar to my first one. I really like how fun and bright the quilts look. I figure they are more likely to be used as a playmat or even a wall hanging so I wanted to do a fun scene. This time with elephants. 

With all projects I start with a small sketch, just to see if what I have in my head makes sense in terms of composition and proportion.


I drew the sort of shape I wanted the elephant to be - then tried to place it on the quilt, at which point I thought I wanted to add a baby elephant and a sun and some balloons to balance it out.

I'd like to pretend that there was a little more technical planning at this stage but nope, those scribbles are about it!

I had some fabric left over from the first quilt but needed a load more so I got to head over to the fabric shop. I live in south London and this is my closest go-to haberdasher. 


So I stocked up - lots of patterns - maybe too many? Er. Oh well. 

Also useful to document the other equipment I'll need for this project. 

- self healing mat 
- rotary cutter
- sewing scissors
- tape measure
- pins
- various thread
- washable vanishing marker
- wax
- craft paper
- pencil
- fusible web


I'll also use my sewing machine although the vast majority of this will be hand sewn. 


So the first thing I did was wash all the fabrics. This is exactly the sort of boring-but-really-important step I would have tried to skip out of when I was a kid. It's tedious and I'm usually raring to get going with my project and really resent this delay. 

But I'm older and wiser now and although its still tedious it really is a must for any quilt project - you have to wash the quilt at the end and how devastating if you have colour run or shrinkage? 

So wash the fabric first. You'll never regret it. 


My quilt is going to be about 120cm x 85cm. This will maybe shift a bit with trimming and eventual binding. The first thing I did was to piece the quilt top. This was quite simple, 2 pieces: the blue sky and the green with daisies. I ran this across on the sewing machine. 


Next up I tackled the elephant. There are 2 options here. You could cut the whole elephant shape from one piece (easier) or the elephant would be made up of different sections (legs, head, body) - this is more fiddly but I prefer the way it looks - it gives more detail and 3-dimensionality to the elephant. 


So to do this I first drew the elephant out, in the size i wanted it for the quilt, on craft paper. I cut out the different pieces.


Then I arranged these on the fabric. Make sure you think about the eventual orientation - I wanted my elephant facing right so here have places the right orientation on the right side of the fabric - but you could of course flip the templates over and place them on the wrong side of the fabric - the latter may be preferable if you are marking up with pencil and don't want this visible on the right side of the fabric. 


So here you can see that I used vanishing marker to mark about 1/2 inch around each piece of the template. This will eventually be folded in on the finished appliqué. 

One additional step here which isn't essential and I stupidly forgot to photograph is the use of fusible webbing. This does help with the folding in of the edges and eventual positioning on the quilt top. The fusible web should be cut out  the same size as each elephant piece (ie, without the seam allowance of the fabric)


Below is step by step of prepping a piece of the elephant, in this case a leg.. 


At the top of the picture you can see the paper template - this is the size and shape we are aiming for with the final piece. 

In this picture you can see I have the piece of fusible webbing in the centre of the piece of fabric. 

I have folded over the left hand side of the fabric (over lapping the fusible web) and pressed it in place with an iron. The web then 'sticks' this in place. 

(NB. You can see that I have trimmed the bottom right corner with a diagonal - this makes it easier to fold in and less lumpy as there is less fabric folded in) 

I then placed the template back on the piece to check the next fold. I lined up the left edge of the template and left pressed fold of the fabric.  

Then, as shown, I folded up the bottom of the fabric pressing it with my fingers and keeping it in line with the bottom of the template.


I then carefully slid out the template and used the tip of a warm iron to press the fold down and stick down with the fusible webbing.


I repeated this for the next 2 sides until all edges of the piece have been folded in and secured with the fusible web. 

This shows the right side of the leg and another one that I completed. They should be the same size as the paper templates. 

This stage can be a bit fussy, especially with small pieces like this but the folding in of the raw edges is important to avoid fraying on the final piece. 


I repeated the above with all the elephant pieces for the big and little elephant. I could then lay these out on the quilt top to see how they looked:


Not great pictures but you get the idea. It's nice to see it all coming together. More progress on this soon! 


Sunday, 30 August 2015

DIY - Hanging a massive print

I am in the middle of a massive post about my quilt project but in the interim I thought I'd mention this DIY I did this bank holiday weekend.


We bought this great old Dutch (?) map when we were living in Crystal Palace last year. As far I can tell it's a map of textile and petro-chemical industry over Europe - just what every home needs! Anyway, it's great and we love it but its about 1m x 1.5m and quite heavy paper and displaying it is a bit of a challenge.

We moved house about a year ago and I'm ashamed to say that this has just been rolled up in the spare room while I figured out how to hang it. I'd ruled out conventional framing as it would cost a fortune and make it difficult to transport. I had seen the hanging systems of basically a rod at the top and bottom to weigh it/stretch it out and wanted to have a go at doing something similar myself. 


So to do this I needed the following:

- 2 lengths of wood measuring 110cm each (I wanted a small amount of overhang as the map is 103cm)
- matt varnish and brush) 
- small hooks
- 4 bulldog clips
- picture wire

(side note: buying the wood was a full on nightmare here in London. I have no idea why. Numerous DIY shops either didn't have wooden dowels or lengths of wood over a metre. I finally bought 2 mop handles and a saw to saw them down to size!)


1. So the first thing I did was saw my bits of wood to size and sand down any ragged edges. If you are luckier than me in terms of suppliers of bits of wood in your local area maybe you can skip this bit. (On the up-side I now have a saw which makes me feel very capable.)

2. Next, varnish the wood. I just used a matt varnish so the wood didn't look so raw. But you could use a stain if you wanted the wood a specific colour or finish. Make sure you wait for it to dry. 

3. Figure out where you want the bulldog clips - I wanted them right on the edge of the map to minimise the corner curls. Once the clips are in position line up the holes with where the hooks will need to be on the wood and make a little mark. Do this for both the top and bottom pole.

4. Screw in the hooks. I used a hammer and a small nail to start off the hole and make sure that the hook would screw in straight. 


5. I screwed 2 eyelets onto the opposite side of the pole to the hooks to attach the picture wire to the top pole. I kept the wire fairly tight as the poster is so big but it can be made more slack to adjust the distance from the nail/hook.


6. Finally, hook the hooks through the holes in the bulldog clips. The good thing about this is if your hooks aren't perfectly placed you can shift the clips up and down to adjust them. I hung the top pole with the map attached and finally hung the bottom pole off the bottom clips. 

Done!

I'm really pleased with how this turned out. And best of all once I had got all the stuff together it only took a couple of hours to finish. 

I'd recommend this as an easy, cheap way to display a large piece like this. Just bear in mind the weight of the paper - this is very heavy duty. I'd worry about a thin piece possibly perishing under the weight of the bottom pole. 

I'm happy that this map is finally out of its packaging and on display.

Now back to the quilt....more on that soon. 


Sunday, 9 August 2015

Guacamole and a new project

We have been having a fairly great summer here in London and I have been spending a lot of time reading in the sun rather than doing as much art and crafting that I need/should be doing. 

I have also been eating a lot of guacamole. I have been making this for years and think I have pretty much got it nailed with info gleaned from years of helping out at 4th of July BBQs. 


I guess most people know how to make guac - but this is mine:

  • 4 avocados
  • A handful of cherry tomatoes (maybe 10? I personally wouldn't substitute regular tomatoes here as cherry are just way better tasting - but if you have great tasting regular tomatoes then go for that)
  • 1/2 a red onion
  • A handful of cilantro/coriander/dunia
  • Lots of limes (I used 3)
  • Salt
  • Pepper
  • Hot sauce


Cut all finely and smoosh/stir together. Eat all weekend in lieu of actual meals.


I am working on a new project, a quilt! It's going to be a challenge as the last one I did was about 6 years ago and I uselessly documented nothing so I have already made a bunch of stupid mistakes that could have been avoided but oh well. 

I do plan to blog about this so at least if I decide to do this again in another 6 years I'll hopefully have some idea of what not to do...again..

These are the fabrics in play - maybe too many patterns? I'll be sharing the idea in the next few days, once I have organised my thoughts!


Sunday, 26 July 2015

The owls are not what they seem - Twin Peaks papercut

I think owls were one of the very first papercuts I did way back in 2007 (?) - and I seem to come back to them every couple of years. 

This latest one I started months ago...and sort of lost the thread and put it aside for a bit, which then turned into a bit more than a bit. While I was doing a big paper tidy up and inventory today it turned up in a pad of paper and I was finally inspired to finish it up (also, it was super rainy so the garden was in no way tempting..).


So I had started the pair of owls, a big and little, framed with a circular branch in turquoise but I wasn't really sure what to do next...although I liked the dark blue background as it was a nice contrast to the owls and looked night-time-ish.


Technical side note for anyone who cares: Gluing down all this sort of piece, especially when it's origami paper rather than artist paper (which is thicker) is always the most tricky bit of the process. I have tried a bunch of different approaches - glue sticks, glue pens, and starch paste...I use all of these at some point but my preferred method is good old pva glue, a toothpick and a load of patience...

Anyway, back to the owls...the night-timishness of the dark blue (and my recent sorting and discovery of lots of grey paper) made me consider the addition of the moon which sort of left a gap in composition. I have been meaning, and avoiding, attempting lettering in papercut but this seemed like a good opportunity to try. 

Twin Peaks has been a long standing fixture in my life since uni...I've lost count of how many times I've watched it and quoted it and it was a definite plus (on both sides) when James and I were in the early stages of dating and realised the other was a fan.

So going down the 'owls are not what they seem' route was a bit of a no brainer. 


The lettering was not a walk in the park but I like the way it turned out so I am up for the challenge of having another go. 

In the meantime, this piece is now available for sale in my shop - don't miss a chance to have a bit of original Twin Peaks art! 


Busy, but not blogging

Oops. It's been a few months since my last post. I blame the halfway decent weather we have been having here in London - it's rare enough that staying in with a scalpel (or a computer) seems a massive shame. 

My sunglasses, kindle and garden have been getting good use though!

I haven't been totally idle... I have had a few map commissions which have been really great fun to do.

The first was of an engagement location - at the end of a pier in Singapore (aw). It was great to have the tension between the density of the city and the wide open ocean:


The next (finished today - phew!) was for a friend - a present for her sister, of the location of her up-coming wedding:


It's currently in the very technical 'squashing/flattening' phase. 

So, I've still been dabbling - in fact the piece above dusted off some cobwebs and I finally finished a long overdue work in progress...more on that next!

Monday, 4 May 2015

Peacock papercut - prints and cards now in shop...

This post has been a long time coming... and another thing that was on my fast-depleting list of things to do for the bank holiday...

A while ago I posted here and here about a papercut I was doing featuring a white peacock. 


I loved how this turned out, especially as it's a departure from the traditional black-on-white approach. 

I decided to have the image reproduced on greeting cards and art prints and I think they turned out great!


The cards are A6 and come with a brown craft envelope and cellophane sleeve:


They are blank on the inside and have a nice weight to them and matte finish which works really well with the design. 

I've already sent a few to friends and family and had a great response so I'm really happy with these.


Next up were the art prints. I had these done as giclee prints on hahnemuhle photo rag paper, which I have used for printing my art before. I think the quality of the print and paper are just lovely. 

I had these done in A5 and A4 and although I love both, the A4 is really striking and looks amazing with the fine detail of the image. 


I'm glad to finally get these out and into the shop.  

Link to the cards is here and the prints, A5 is here and A4, here

Thanks for looking!

Apron with pockets

This weekend I set myself a pretty long 'to-do' list. Typically, I left it all until today. First on my list was to finish an apron I started earlier in the week (part of the A Beautiful Mess Sew with Us course). 

It was pretty great to use up some of the fabric I have collected over the years and never seem to put into action. 

I like how it turned out in general. The original pattern was for a half apron but as I am often a bit of a mess in the kitchen so I wanted to add a top half. I added a bit that was wider at the waist and narrower at the neck - it turned out ok but sort of a little baggy under the chest.....I think I maybe should have done a square? or maybe narrower at the waist (which is what my Mum suggested, I have no idea WHY I didn't listen) Oh well, live and learn. 

Here's the finished piece: 


I put it into action today as another item on my list was to make chocolate chip cookies - I used this recipe and they turned out really well - I always seem to struggle with getting the cookies the right amount of chewy in the middle. I followed the recipe to the tee and it delivered!

Anyway, back to the apron. I'm happy with it, it works (?) and it's nice to have made something cheery and functional.