Sunday, 24 April 2016

Papercut giveaway! Plants and lamps

I'm on a roll with the paper cutting - James bought me a drawing table for my birthday and I slotted my cutting mat onto it and hey presto: no more hunching over the living room table!

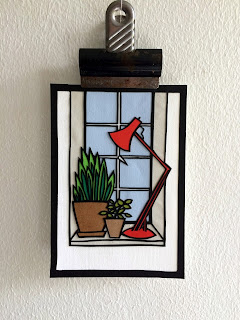
To celebrate my increased productivity and improved working conditions I thought I'd giveaway my latest papercut: 


I really like how this little guy turned out! I love the lamp...its a vintage red anglepoise that we picked up in a Crystal Palace second hand shop and I use it for all my crafting and cutting so it seems like a fitting tribute. 

So how do you enter? Well, this lamp is one of my favourite things in our home - so leave a comment on here or over on my Instagram post (or link on the right) telling me what your favourite piece in your home is. 

We are in the process of buying a house (eek!) and we'd love some inspiration!

This is open to anyone anywhere and postage is included. 

I'll choose a winner at random on Saturday 30th April. 

(A bit more about the piece: Its an original piece of papercut art, designed and handcut by me from layers of artist quality paper. Its 10cm x 15cm so will easily pop into a standard sized photo frame) 

Thanks for in inspiration and good luck!
Saturday, 23 April 2016

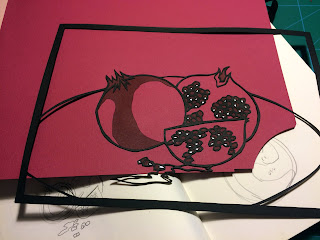
Pomegranate papercut

I love pomegranates. We had a little ornamental pommie tree in the front garden of my house growing up. The fruits weren't edible but it didn't stop me from trying (more than once).

I'm really enjoying the new direction of my papercuts so I decided an ode to my favourite fruit was in order.


Those pips! Gah. But it was worth it. Here's a closer look at some of the detail:


And here is an interim point in the cutting that shows the outline. I overlay it on each new colour to see how it will look...and I'm always tempted to stop at this point. 

In this case I'm glad I carried on but maybe with a future piece I'll stop, we'll see. 

This piece is now available in my shop

Monday, 11 April 2016

Pot plant papercut

I did another papercutting this weekend and although halfway through I felt like I was going insane I am so so pleased with how this turned out! 


This piece reminds me a lot of Jean Jacques Rousseau, He was one of my favourite artists growing up. I love all the stylised foliage in his jungle pictures. Apparently he spent a long time in botanical gardens painting different exotic plants which he later used in his paintings (that from a essay I wrote for my IB art class..). 


I especially like that this piece depicts our actual plants on our actual window sill. Most of my papercuts are pulled from my imagination so it was nice to do something different. 

But man, I could really tell that this was a new direction...I must have gone through 10 blades cutting this piece. That window pane was a killer. I'm glad I stuck at it as the lines of the panes work really well with the organic shapes of the plants. 

I'm excited to do more of these but for now this one is now available in my shop


Sunday, 10 April 2016

DIY terracotta plant pots

I have always loved plants. When I was a kid I used to save up my pocket money to buy African violets...very rock and roll of me, I know. 

Since we moved to London I have been slowly accumulating a new family of house plants and a couple of years in, some of them are in need of re-potting....which was a good excuse to do a DIY I had in mind for plain terracotta pots.


Pots are annoyingly expensive and most of the time not what I really want anyway. I really like terracotta but it does get a bit same-y if you have a lot of plants in one room.

I picked up a few different sizes of pots from my local hardware store. They were only a couple of quid each. I also got 2 pots of gloss paint in magnolia and turquoise - look for little 'small project' or tester pots to save money unless you have other projects in mind for the rest of the pot.


Stuff I needed: pots, masking tape (I actually used packing tape as I didn't have masking tape to hand which was fine but masking is probably better), brushes, white spirit and gloss paint.

I just wanted to try something simple so decided to try one colour block type-pot and one drip...


So for the drip one...


1
2


3


I upended a pot and started by painting the base and slowly easing the paint towards the edge until it began to form drips and trickle down the sides of the pot. 

I think in retrospect I could have thinned the paint down a bit. I was quite thick and when it dried it went a bit crinkly. I don't really mind it though and James just described it as looking 'organic'. Fine. 


For the colour block one I taped off the base of the pot and painted the upper half. I also painted the inner inch and a half or so in the pot... I just think this gives it a more finished look but its down to personal preference.

I left it to dry for a few hours and then peeled off the masking (packing) tape. Very satisfying.

1
2


3
4


They aren't perfect but I think they turned out well and unlike some other projects I have done, I don't mind the imperfections.

I really like the colour block ones - I'll be doing more of them for sure. And maybe something with more stripes or zig zags? I'll need to pick up some masking tape for that!

I think my plants look pretty happy with their new homes.


Saturday, 9 April 2016

Deer papercut - now in shop

So I finally did a new papercut! It's been ages as I have been busy with my quilt. I have had some plans rattling around in my head for a while and haven't really been able to get them out...


This isn't the actual project I had in mind but as it is a departure from my usual style and process for papercutting I just wanted to do a quick project to test the water. 

I actually did most of this piece one Sunday evening so it was fast which was really satisfying. 

The black outline approach is new for me...it does add a layer (haha) of complexity but I do like the way it looks like stained glass. 


Here's how it came together:


1. I used a white pen to sketch the
outline of the image and then cut out
the lines..
2. The finished outline - this is all cut
from a single piece of black craft
paper.


3. I started building up the colours inside
the outlines. I started with the foreground
- flowers, deer and worked backwards. 
4. Building up the various layers to
create the background and sense of
depth.


And...done! I like how it turned out and it was fun to try a new style. I also feel like I have a better idea of how to take forward a bigger project that I am trying work out. Although probably more smaller projects like this are in order before I dive into that so keep posted... 

This piece is now available for sale in my Etsy shop

Saturday, 2 April 2016

Some good stuff I saw recently..

I've noticed some good stuff about at the moment and thought I'd share...


- A papercutting competition! If like me you’ve fallen off the wagon and need to dust off your scalpel and get back on.. check it out here.

- Last episode of Fresh Meat (Channel 4 here in the UK). This show was so great and the last episode was brilliant... I'm literally going to start re-watching the whole thing immediately. If you haven't seen it, do.

- This amazing work from Conrad Jon Godly. How stunning? Credit to Danielle Krysa @ The Jealous Curator for bringing to my attention. Reminds me of my love of Kyfin Williams and my own forays into oil painting.

- I just discovered Marimekko design. I am going to have to use some restraint in not buying all the plates, they are great. 

Enjoy!