Wednesday 30 March 2016

Super easy spinach and feta pie


My main reason for starting this blog was to keep track of what I make (and how). Initially my papercutting work but also other crafting.

Over the last year I have started cooking more. Mainly because I am trying to eat healthier and buy less processed/packaged/preserved stuff but also because food is James and I’s favourite thing ever and we can’t afford to fly to Europe/eat out in London all the time so we (mainly me) try to re-create at home.  

As you can imagine this has led to some pretty disappointing dinners and the odd tantrum or two (mainly me).   


Failures aside, I thought I’d share one of my favourite, easy, go-to dinners. A Greek filo pastry pie. The original recipe is here:  and I haven’t changed it much but just in case it disappears from the Internet here it is:

1. First wilt 250g fresh spinach leaves in a pan (5-7mins should do it), remove from pan to strainer to drain and cool.

2. In a bowl beat 2 eggs and add ~180g (one pack) crumbled Feta cheese, 150g semi dried tomatoes, drained and chopped and mix well.


3. Unroll the filo pastry - I use about 3 sheets in total but this depends on the size of your sheets (mine are about 30cm x 45cm). Take the first sheet and lay it flat on your work surface, daub or brush with the tomato oil then carefully lay it oil face down in your pie tin (loose bottomed is ideal, mine is 20cm in diameter) gently easing the pastry layer to the edges. Repeat with the other 2 sheets arranging at different angles to ensure even pastry coverage.


4. Squeeze excess water from the spinach, chop finely and add to the eggs, mixing well.

5. Plop the filling into the pie tin, spreading evenly. Fold up the pastry edges over the filling toward the middle so the top of the pie is well covered. Daub the top with some extra oil and pop into a 170c oven for about 20 minutes (this pie is pretty forgiving).  


6. Remove and eat. It keeps in the fridge for a few days and is just as nice cold although you miss the crispiness of the filo.

This pie is also a good option for the 5:2 diet, if you care about that sort of thing. 1/4 slice is about 270 calories.

Also, taking photos of food is hard! Especially as I made this one evening so didn't have much natural light as I probably need...luckily this pie isn't much of a looker although it does taste great!


Sunday 27 March 2016

Trying out blackwork embroidery

So when I was doing my quilt there was a bit of embroidery involved, which I don't really have much experience in but I really enjoyed it and I've seen a lot of super inspiring work from embroidery artists on the internet.

I mean, how stunning is this work by Chloe Giordano. 

James picked up on this and he got me this book for Christmas. There are a load of great projects but one style that I really liked was the the blackwork, very stylised, geometric patterns usually done with black thread on white linen. 


 The book had a load of different patterns and stitches, and as I didn't have a project in mind but did want to get stuck in I decided to do a sampler-sort-of-thing to test the different patterns. 

I sewed a basic grid pattern onto some white aida fabric - 6 squares by 4 squares - and tried a different stitch in each square. 


I love this sampler - I sort of want to frame it! Blackwork is so tidy and orderly. I really want to figure out a way to use this in another project - I feel like maybe something architectural or abstract? I'm working on it. 


Catching up on Christmas crafts

It's Easter Sunday and after my my last mammoth post on finishing my quilt I figured I needed to catch up on some of the other stuff I have done since. 

It feels a bit untimely but oh well. 

This past Christmas was the first one that James and I spent on our own. Aside from the initial panic of having to do a Christmas dinner, which turned out awesome in the end, it was really great to have total freedom to do what we wanted when we wanted. 


We got up unpleasantly early to get our lamb shoulder in the slow cooker. 

We more or less followed this recipe - I stuck the shoulder with anchovies, garlic and rosemary and it turned out really great, the gravy was especially good. 


We rewarded ourselves for our early start with some bucks fizz with freshly squeezed orange juice and champagne. 

Check out our vintage juicer - I love it. 


This was our Christmas tree - bigger again than last year but due to all the felt ornaments I made last year it was pretty full. 

It did need some bigger ornaments though so I took some inspiration from a xmas decoration given to me by a friend a few years ago. 


These hearts were quick, easy and I really liked how they turned out, they looked great on the tree too. 

I cut out 2 heart shapes from some felt, used a basic backstitch to embroider a snowflake in a contrasting colour with embroidery floss on one of the hearts, used another colour for a blanket stitch to sew the hearts together, leaving a small hole to stuff the ornament so its a little plump, and then blanket stitched the hole closed.

I finished then up with some floss as a hanging loop adding a few sequins for decoration. I'll be making more of these for sure. 


Elephant baby quilt - done!

I have finished my quilt! 

It was a LOT of work but it went really well and I got it to it's intended baby before he was more than a few month old so that was a result. 

I didn't blog about all the steps in between where I left off and the finished piece - I was all focussed on just getting it done. The previous posts on my quilt progress are here: part 1, part 2, and part 3.

So, the elephants are done and stitched to the quilt top and next I moved on to the balloons. I decided on 3 different red fabrics for them, and decided on an arrangement that worked with the position of the elephants and sun. As with all the other elements of the quilt I first drew and cut the shapes on to tracing paper and then fusible web. I then used the tracing paper templates to cut out the balloons from the three red fabrics - I prepared the appliqué balloons the same way as the sun - turning in a 1/4 inch seam allowance around the edges of the shape. 

Once these were done I was able to assemble the quilt and adjust placement of all the elements:


And then blind stitch/applique them all down on to the quilt top - it was a good feeling to finally have all these bits and bobs come together into one unit.

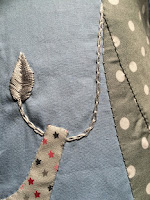
So after that, I employed some very basic embroidery to work in the elephants tails and the strings of the balloons.

I used chain stitch for the balloon strings and most of the elephants tail and satin stitch for the end of the tail.

I really have no experience in embroidery but I liked doing this and how these bits turned out.


So at this point I had a finished quilt top. Awesome. 

Next up, putting it all together. I knew my backing was going to be this great blue and white polka dot, but I wasn't sure on the binding... I was thinking about red or yellow but they seemed too close to the balloons and sun so I decided to bind the quilt with the backing fabric. 

2
1


3
4


1. To make the quilt 'sandwich' you need enough floor space to lay the quilt flat. I laid the quilt backing, right side down, on the floor smoothing out any wrinkles. Then I laid the quilt batting on top - getting this positioned and flat can be tricky, batting is sort of clingy. 

2. Next the quilt top goes down - face up. You can see that the batting is cut slightly bigger - I find it easier to do this and then trim it down to size. 

3. I used a few pins to secure the 3 layers together. I find it best to start in the middle and work out toward the edges, smoothing it all flat as you go. I folded over the edges and clipped them together.

4. Finally, I used a basting stitch, starting at the middle and working toward the edge in straight lines and then again in increasing concentric circles. This is a sort of annoying and time consuming task but it is really worth it. It makes it much easier to work with the quilt all the layers are well fixed and not slithering about. 

SO THEN...actual quilting...finally. I don't really have any pictures of this as its hard to photograph but basically I used small running stitches in matching colours (yellow for sun, red for the balloons etc) to outline the different applique elements. 


The sky and grass had some large areas which needed some additional quilting to keep the layers together so I added some quilted clouds in the sky and some scattered flowers in the grass. 


Once all the quilting was done it was time to do the binding. I trimmed the quilt top and batting to 1 inch less than the backing fabric. I folded over the excess backing fabric twice, first fold with the raw backing edge against the edge of the topper and backing, then over again on the quilt top. 

I used the much more detailed instructions over on the super helpful tutorial on cluck cluck sew.


I added a last minute label to the back of the quilt - my name and date I finished the quilt. I guess this is a thing that's done? It's a good idea. 

And it's done! After a final wash in the machine (on gentle). 

I'm really pleased with it. And so was my friend, the baby seemed indifferent. 

This was a pretty all consuming project for a while and sort of bumped all other crafting and papercutting out of the picture for a while. I did manage a few other projects since then so more on those next...